• Happy National Garlic Day! 🧄🚫🧛🏼‍♂️

Colden Canoe Decks

Joined
Sep 30, 2020
Messages
60
Reaction score
139
Location
Richmond, VT
Does anyone know how Colden Canoe attached there wooden decks to their wooden inwales? I don’t see any screws in any of the photos I’ve seen, so it seems as though they were epoxied on or screwed from underneath before the outwales were screwed in.

I’m refurbishing a Bell Merlin II B/G and considering alternatives to inset decks. Mostly because I made a rookie mistake and muffed-up the apex joint 🤬! But even before that tragic turn, I was considering small wood, or thin composite plates that would keep the inwales out of the stems to prevent rot, or slow it down anyway, and leave a thin gap between the plate and the stem for drainage.

I don’t want to go the no-deck route, I don’t have the woodworking skills to correct my mistake, and I don’t like the giant wooden caps typical of a Royalex Explorer. And plastic caps is definitely out.

The Colden decks seem more low-profile, small enough to be light weight and not split, and with the right grain add that pretty wooden jewel accent to the boat that makes girls say, “wow, that’s a nice deck!”

734DC426-1035-4030-A8FD-67ED8459C275.jpeg

30BE6849-7D8E-4663-B99F-B58CF3367DD5.jpeg

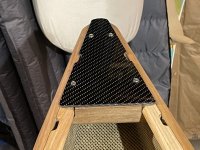
I also kinda like the idea of a composite sheet screwed to the inwales. Not quite as pretty, but very light weight, rot proof and serviceable. You can easily remove them to give the ends of the inwales a thorough oiling. Here’s an example from Millbrook Boats that I think looks pretty sharp.

49C8F509-0109-4516-8E2D-693126A0C104.jpeg

I would use just one screw at the stem attached to the longer inwale that I haven’t screwed up yet. This is just black tinted fiberglass, but since the boat I’m working on has a carbon fiber exterior, I was thinking why not matching carbon fiber decks? That might keep it classy.

Curious of what you all think of the two methods, and again, if anyone knows how Colden did it.
 
The Colden canoes I've looked at with composite (snakeskin?) rails have a short, molded carbon deck that is glued on. I don't recall what kind of decks were on wood rail Coldens.
 
I have done new decks and gunnels from scratch on a couple of boats, but I've never seen a Colden in person,

That said, from the photos you posted of the Wild Fire and Flash Fire, I feel confident the decks must have been epoxied in place because (1) it would be too much of a PITA to drill and drive screws up through the inwhale in the cramped confines of the point of the bow/stern, plus (2) it would weaken the inwhales too much since they used 3 horizontal screws per side under the deck going through the outwhale into the inwhale.

But even if I'm wrong about what Colden did, it doesn't really matter. You aren't doing a musuem restoration (muffed apex joint, which of course no one will ever see). So, attach the deck the way that makes sense, which to me is epoxy. Before attaching the deck, I'd "paint" it's underside completely with unthickened epoxy so that you never have to worry about it rotting. After it's dry, scuff sand the underside of the deck only where it will ride on the gunnels, mix up some thickened epoxy and glue down the deck. Clean up the squeeze out and put a nice fillet between the underside of the deck and the gunnels to keep water from getting in there.
 
A couple of pictures of the decks on my Colden Nomad.

The inwales are the same length as the outwales. There is a triangle filler block between the inwales and the capping deck piece is glued to it. Of the three screws you see in the outwale, the forward one is short and fastens into the inwale. The two back screws are long and go thru the inwale and into the filler block. The black trim between the fiberglass hull and deck cap is a piece of automotive edging.

If stored outside I believe this construction could definitely trap moisture. My Nomad is stored inside so not a concern. As alsg mentions, make sure the wood is well sealed.


IMG_5350.jpg

IMG_5352.jpg
 
I agree with all of that and assumed that was the case. I just wanted to make sure I wasn’t missing something. I guess it just doesn’t seem like a strong attachment with glue alone considering the rounded profile of the gunwales I’m using. I’ll have to make sure I fill that gap well to increase contact.

Is there risk of premature delamination if I’m oiling the rest of the wood surfaces? Bell and Northstar fill the tip of their gunwale joints with epoxy to bond them all together, but most of the ones if seen have failed except for the joint to the hull.

I’m sure I’m overthinking it, but that’s half the fun for me. I wish I overthought that apex joint though! I’m starting to think it’ll still end up looking pretty nice though, especially if I can make the decks as thin as Colden did.

70657BF3-95AE-4F67-834B-8EF6FF1FABCB.jpeg
 
@saltandsky Thank you! That’s exactly what I was looking for. That makes more sense for a stronger connection. It’s essentially a rough inset deck with a beautiful cap on top. Would definitely have to make sure that’s all sealed really well.

What a beautiful boat!!
 
One detail.. Paul used car door edge molding.. That little strip of rubber under the deck to help avoid abrasion. The cap is rosewood but you can find other nice looking scraps. We have a hardwood dealer nearby who can give us little pieces of exotics for free. You may have the same in your neck of the woods.
I' d check my WildFire but the barn its in is not approachable right now.. sheet of ice and can't get ahold of the sanding guy.. we need 400 feet x10 feet of sand.
 
@yellowcanoe I figured the edge molding was more for covering up the raw edge of the Kevlar sheer. It certainly does look clean.

My original intent was to make bookmatched, inset decks. So, I went to my local specialty “Treehouse” and picked out a couple 1-5/8” thick walnut scraps with interesting grain for cheap. I’m no woodworker, and have limited tools, so it’s a bit of an experiment to see what I can do with just a radial arm saw that I got from my wife’s grandfather. I just tried ripping the half-deck down to 1/2” thick and the test piece exploded! I think the grain may be too funky, or I should’ve been using a bandsaw in the first place.

4DFA9734-D35E-4168-8C0D-5F0C9F05C44C.jpeg

My friend, who knows these things better than I, says that piece of wood won’t hold up and will be cupped within a year because of the grain and “doesn’t belong anywhere on a boat”. The carbon deck plates are starting to sound more appealing by the minute. Simple, utilitarian and no gunk-traps.
 
Don't know about that piece of walnut but walnut can make a striking deck. Here's one I made.

12b0d5c3-b16b-4450-925a-50befd4bade0_1_105_c-jpeg.128691


Bit of tutorial here. They were inset.

 
@alsg Wow, that’s really nice! Very clean. The joints look remarkably similar to what I had imagined, but I think I’ll just go back to Elmers glue and roofing nails and call it a day.
 
@Glenn MacGrady Man, those are beautiful boats! The Bentley of canoes.

Saltandsky posted a photo above that shows they were glued to an inset block underneath that was screwed in from the outwale. That’s a little harder for me to do with my rounded gunwales, unless I buy a $50 router bit.
 
I can’t answer for the Colden but I occasionally will assemble the whole inner structure and then install it with outwales in one go.
BD7A05C0-E893-4D67-B5B7-C39C420B64BD.jpeg
0C22FEA6-2896-41B8-8943-D2BF6DB515BD.jpeg
Jim
 
Figured I would post an update of my final results. I decided to follow my original intuition of mimicking the Millbrook decks for simplicity, better drainage and minimal rot. Should have gone with 1/16” carbon decks, but 1/8” will be super rugged for thumping down steep portages. D8C3BBF5-5B38-4E82-A2A4-85448772B76C.jpeg
 

Attachments

  • A405E88F-CEC2-4D08-A23A-A5A6F0D5CB9C.jpeg
    A405E88F-CEC2-4D08-A23A-A5A6F0D5CB9C.jpeg
    148.2 KB · Views: 5
That should work well. I like having a drain at the far ends. I ended up drilling holes in the wood decks of a couple of canoes I've purchased just for that reason.
 
Last edited:
Figured I would post an update of my final results. I decided to follow my original intuition of mimicking the Millbrook decks for simplicity, better drainage and minimal rot. Should have gone with 1/16” carbon decks, but 1/8” will be super rugged for thumping down steep portages. View attachment 134918
Oooh, I might do some carbon decks next time....
 
Oooh, I might do some carbon decks next time....
Just be careful, the carbon dust is some nasty stuff! Outside with goggles, the best mask you can find, and latex gloves with your sleeves taped off. Some dust got up my sleeves and irritated the sh*t out of my skin for a day. I rinsed the pieces off in a bucket of water and wet sanded the edges to help control the dust. Diamond tile blade on an angle grinder worked great for cutting out the shapes with no chipping. I bought the 12”x12” gelcoated plate from Dragonplate.com. Not cheap and they soak you on shipping, but I’m pretty pleased with the final product.
 
Just be careful, the carbon dust is some nasty stuff! Outside with goggles, the best mask you can find, and latex gloves with your sleeves taped off. Some dust got up my sleeves and irritated the sh*t out of my skin for a day. I rinsed the pieces off in a bucket of water and wet sanded the edges to help control the dust. Diamond tile blade on an angle grinder worked great for cutting out the shapes with no chipping. I bought the 12”x12” gelcoated plate from Dragonplate.com. Not cheap and they soak you on shipping, but I’m pretty pleased with the final product.
If I do it, I will just order them laser or water jet cut out. Like from sendcutsend.com
 
Here is the deck on my Colden Dragonfly. I apologize for the quality, but it is just sticking my cell phone under the deck. The first photo is under the deck; you can see the three screws. Second photo is the deck taken from the side to show there are two layers of wood. The top of the deck is unblemished by any fastenings.

ColdenUnderView.jpgColdenSideVkew.jpg
 
Back
Top