• Happy National Telephone Day! 🔔☎️📱📶

Kevlar Guideboat Build

Joined
Mar 24, 2015
Messages
577
Reaction score
24
Location
Kansas
First a disclaimer: I will never build another canoe in this method. I might build another all composite boat, but I will not use the foam strip and mud method. More on that later. I would highly recommend building a cedar strip canoe and using it as the male plug for the Kevlar and glass boat. In that way you would end up with two boats for not much more effort. Sell one if you like or keep them both.

References that come in handy:

Building Your Kevlar Canoe by James Moran
This book is where it all started for me. Improvements in the method have been made since publication

Boatbuilder's Manual by Charles Walbridge
A great book on composite construction from the very beginnings of composite canoe and kayak construction. It is still a great reference today.

http://www.myrabo.com/k-canoe/index.htm
This guy used the Moran method and made the single biggest improvement. Window shrink film. More on that later.

Prologue:

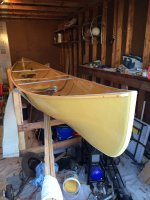
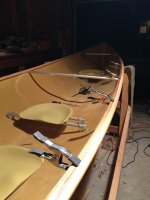
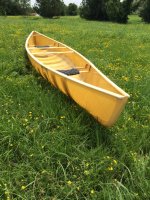
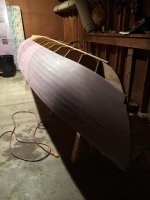
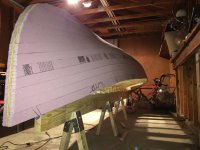
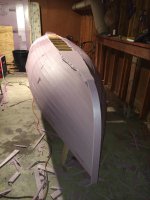
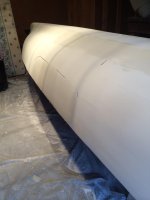
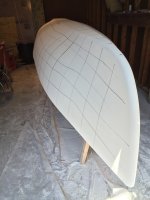
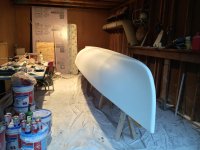
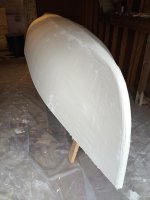
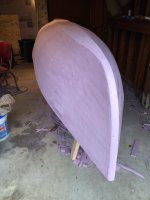
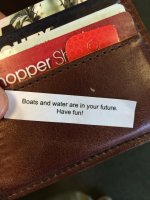
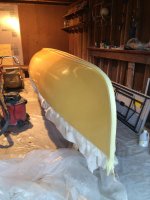
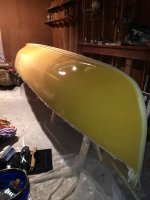
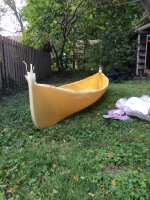
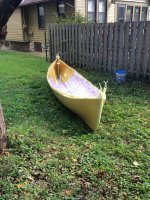
I have done some canoeing over the years, I'm 29 now, so I haven't had that much time yet. Most of that canoeing has been in KS, MO, and AR in rental boats, aluminum or royalex. It dawned on me at some point that I should have my own canoe. I asked my girlfriend if she would go canoeing with me and she agreed. She was out of town for the weekend, so I told her I might buy a canoe by the time she got back. I naturally looked for the best canoe I could find, a lightweight composite boat. I was hit by sticker shock and when she got back she asked if I had bought a canoe. I said, "No, but I bought a book on how to build my own." She laughed at me. Little did she know what a monster I would become. She is still around despite it. The first boat I built using this method was a John Winters' Mattawa. It has one layer of 9 oz Kevlar and two full layers of 6 oz S-glass. The boat came out at 43 lbs. Right in line with Swift's version of the same boat.

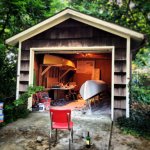
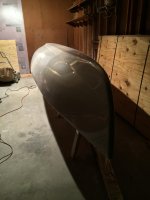
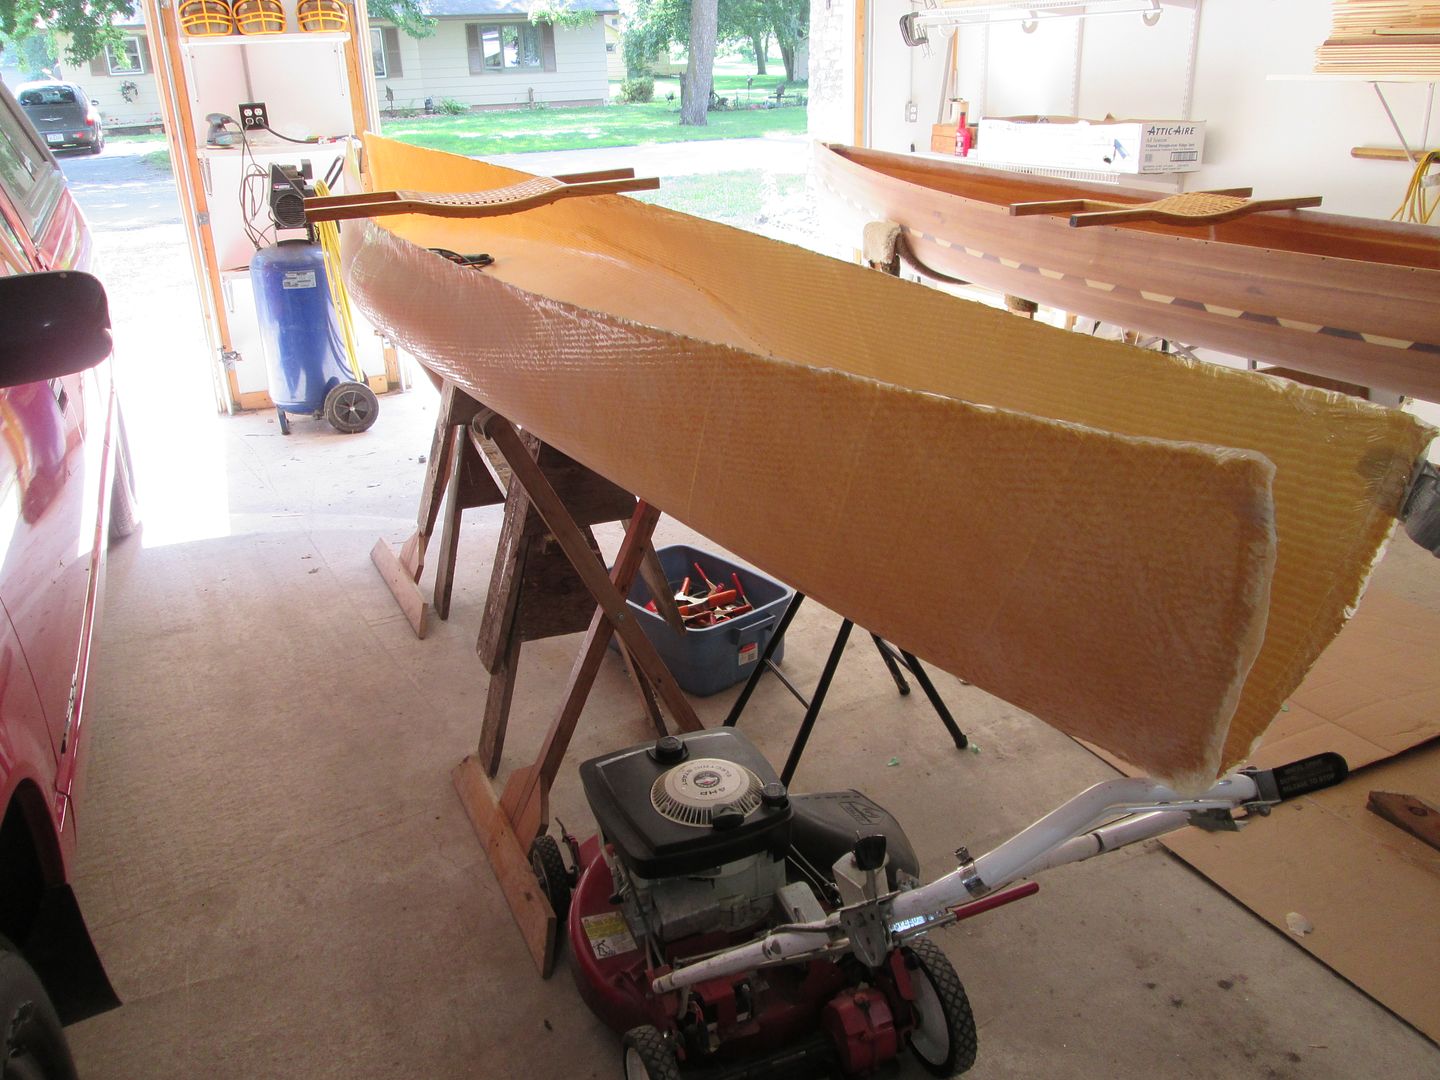
Which leads me to the current build. A Grant Virginia guideboat b*st*rdized in Kevlar and fiberglass. The lines came from Building an Adirondack Guideboat by Michael Olivette and John Michne. I started by modeling the station molds in a CAD program, and one of my engineering friends stayed late after work and commandeered the plotter. I made a couple modifications to the design. I added 2 inches to the sheer throughout the middle of the boat so I wouldn't have the oars banging on my knees, and I reworked the stems for the composite construction. On to construction in the next post. I'll get this all cranked out tonight, but I have a beer and tobacco habit and the weather is nice.

This should go before the prologue I guess, but I would like to thank Hamms and Old Milwaukee. The recycling money alone from the cans I drank while building this boat could probably buy the supplies for my next project. My girlfriend for being patient and tripping with me, and my parents who have become lamination experts. I built the first boat at their house, since I didn't have a garage at the time.

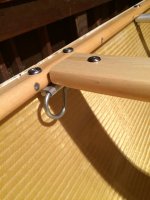
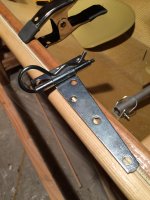
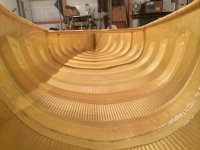
I'll try not to be so long winded in the upcoming posts. I'll leave you with some pictures of the Mattawa.
 

Attachments

  • photo1852.jpg
    photo1852.jpg
    271.2 KB · Views: 6
  • photo1851.jpg
    photo1851.jpg
    219 KB · Views: 6
  • photo1853.jpg
    photo1853.jpg
    268.7 KB · Views: 6
  • photo1854.jpg
    photo1854.jpg
    177.3 KB · Views: 6
No Title

Construction:

Just like any cedar strip boat I start with the strongback and the station molds. This is the last time I'll use the T shaped saw horse style strongback. It is nearly impossible to find good straight lumber around here. Once the stations are set up it is time to move on to stripping the hull. The method is the same as a cedar stripper except we use pink foamboard insulation instead. Cutting the strips of foam with a saw is a pain and makes you look like a hostess sno ball. Equally a pain, on the first canoe I didn't have access to a table saw, so we set up a radial arm saw to rip. The solution which I highly recommend is a hot wire. A hot wire for those unfamiliar is just a thin wire that heats up with electrical current. DON'T TOUCH THE WIRE. I can't really describe the feeling of being burned and shocked at the same time except that I don't like it. I bought this one and love it, but it is probably overkill considering you can buy cheaper ones or make your own. The fence is great for cutting long strips...

http://www.amazon.com/Proxxon-37080...7326849&sr=8-1&keywords=proxon+hot+wire+table

Proxxon 37080 Hot Wire Cutter

It seems the price has gone up. I got mine for $70. The hot wire makes cutting foam strips a breeze. I was done in no time. No mess. Great straight cuts. If I recall correctly I cut down the 4x8x1/2 sheets of foam into 1.5" strips. The strips don't need to be as narrow as cedar strips, since they are easily sanded and any gaps will be filled later. The strips are then glued on to the stations with hot glue. A standard craft store gun will not work for this. In my continual quest for going overboard I bought this glue gun. It is fantastic, but any glue gun that gets real hot will do the trick...

http://www.amazon.com/3M-Scotch-Wel...427327224&sr=8-2&keywords=scotch+hot+glue+gun

3M Scotch Weld Hot Melt Applicator

Stripping with foam is great. It goes very quickly and you get to see the shape of the boat unfolding in no time.

If only it was that pleasant for the whole build...

I'll post some unrelated pictures as I go along. It's nice to look back and see what else I was doing during this build.
 

Attachments

  • photo1859.jpg
    photo1859.jpg
    247.9 KB · Views: 6
  • photo1858.jpg
    photo1858.jpg
    239.2 KB · Views: 5
  • photo1857.jpg
    photo1857.jpg
    251.8 KB · Views: 6
  • photo1856.jpg
    photo1856.jpg
    234 KB · Views: 6
  • photo1855.jpg
    photo1855.jpg
    677.1 KB · Views: 5
  • photo1860.jpg
    photo1860.jpg
    176.6 KB · Views: 5
No Title

Mold construction continues:

I use a fillet knife for trimming the ends of the foam strips once they are on the boat and for shaping the bottom board. This is just for roughing out the shape. I go back and finish shape with various sanding blocks and boards. The foam dulls the blade surprisingly quick so have a sharpener handy or don't use the same knife you use for fish. Once everything is glued and rough shaped the first round of sanding begins. No power tools here. A couple long boards will make quick work of the foam. I use a flexible board to fair the curves and a stiff board for the bottom board and chine area.

Once the foam is fair comes possibly the worst part of this method (I'll probably say that several times, have I mentioned that you should build a cedar stripper instead of a foam mold?). Drywall mud. Coat the whole thing with drywall mud. Several coats. Then several more. It isn't easy. Imagine mudding drywall seams. Now imagine that those seams don't have a single flat spot and you have to follow those curves always keeping a uniform thickness. Start with the lightweight compound. Put on a good thick coat to fill all the gaps and seams between the foam strips. This is where the hot wire makes life much easier. Because it cuts the strips so well, there are only small cracks to fill. Once the first coat is on curse yourself for getting into this ridiculous project knowing you have several more coats to go. When the first coat is dry knock down the ridges and bumps with one of those foam sanding blocks. Wipe it off and repeat. This process is just repeated a few times, as many as you want until you're happy with the mold. I like to use the topping compound for the final coat. It goes on really smooth with minimal bubbles.

Once it is faired to your liking, this will take more or less time depending on the personality, but keep in mind that this is the final shape of the boat so don't skimp, you are almost ready to laminate.

I noticed this last post has turned to an instructional tone. Maybe I'm trying to block out that I did all this.

I took a break from the boat here for a while. Took a trip down the Eleven Point river in Missouri. Another down the Kaw through the Flint Hills of Kansas. Laminated the Mattawa canoe for the second time. Took a business/pleasure trip to Idaho. Met up with SunCatcher from the BWCA message boards, who is a business colleague of mine, in Nebraska who picked up my gunwales from Northwest canoe on his way back from tripping in Canada. Thanks Paul! I promise I'll finish fixing your paddle soon!
 

Attachments

  • photo1862.jpg
    photo1862.jpg
    158.5 KB · Views: 3
  • photo1865.jpg
    photo1865.jpg
    235.2 KB · Views: 1
  • photo1864.jpg
    photo1864.jpg
    266.9 KB · Views: 4
  • photo1863.jpg
    photo1863.jpg
    212.6 KB · Views: 3
  • photo1866.jpg
    photo1866.jpg
    211.8 KB · Views: 3
  • photo1867.jpg
    photo1867.jpg
    274.9 KB · Views: 3
  • photo1869.jpg
    photo1869.jpg
    331.8 KB · Views: 3
  • photo1868.jpg
    photo1868.jpg
    248.4 KB · Views: 3
Muskrat,
I just bought that Boatbuilder's Manual from Amazon...I had a copy that disappeared long ago, didn't remember the title, but I remember all the invaluable engineering properties in the tables. Thanks for the memory jog!
Thanks for putting those photos and the descriptions up...I have tons of comments, but I'll wait until your presentation is complete.
 
I started with Morans book also. Thought about building a foam plug. But by that time, I already had several strippers under my belt.
I was building a stripper with tumblehome, and used it for a plug. Only trouble I had was keeping the cloth tight to the hull in the tumblehome area. I've got a trick for that I hope ! I also used heat shrink plastic, for the release. Worked great.

The draw back to a foam plug, is what do you do with when you're done ?

I also am looking forward to more of your build !

Jim
 
No Title

Mold construction done. Preparing for Lamination:

After the mold is mudded and faired it is time to prep the surface for laminating. I put on a coat of drywall primer, not sure at the time if I would be able to use the heat shrink window plastic. Because the plastic bridges hollow sections of the mold, I originally thought I would have to prep the mold to a mirror finish and wax it to release the finished hull. That is a lot of work, so I eventually settled on the conclusion that I think Jim has come to. Double stick tape.

Window shrink film insulation...

http://www.amazon.com/Duck-281504-In.../dp/B000NHY1P0

This stuff makes an excellent mold release. On the under side of the stations I stapled on a length of wood batten. The entire length of the boat. Both sides. Then I applied double stick tape to that. The window shrink film is laid over the mold like you would lay on fiberglass cloth. It is pulled as tight as possible and attached to the double stick tape underneath. You end up sheathing the mold in clear plastic. To deal with the hollows in the guideboat shape I ran double stick tape along the lowest parts of the valleys before I applied the plastic. Sorry, I don't have a picture of this. Where the tight plastic would naturally bridge a valley, the double stick tape holds it to the mold. This was the most frustrating part of this step. For those building canoes which typically have much less hollow areas, you are in luck. I also ran a length of tape down the middle of the bottom board to hold the plastic in place while I stretched it by hand. Once the plastic is in place as tight as it can be by hand, we use a heat gun to stretch it absolutely tight. As heat is applied to the plastic it shrinks. Working out all the wrinkles is tough. I burned through the plastic in a couple spots, but you can use double stick tape and more shrink film as a patch. Clear packing tape can work as a patch too, but if there are any wrinkles you're stuck with them. Try not to melt a hole. No patch can be made perfect. I apply the film the night before I laminate and then right before I laminate I hit it with the heat gun one more time because the film will relax some over time. Almost forgot. I was glad I used the drywall primer because double stick tape will not stick to plain drywall. It is too dusty. The dust clogs up the adhesive and it will slide around when the plastic shrinks.

Have someone help you with these steps. It would be extremely difficult without someone holding the plastic off the tape until you are ready to stick it.
 

Attachments

  • photo1870.jpg
    photo1870.jpg
    196.8 KB · Views: 4
  • photo1871.jpg
    photo1871.jpg
    215.7 KB · Views: 4
  • photo1872.jpg
    photo1872.jpg
    258.7 KB · Views: 4
Last edited:
No Title

Lamination:

The layup schedule for this boat is (starting from the inside) 9 oz kevlar, 9 oz kevlar, 6 oz s-glass, 6 oz s-glass, all full layers. It is a thick and heavy layup. Most canoes built in this method use 1 9 oz layer of kevlar, 1 full layer of s-glass, and 1 partial layer of s-glass on the bottom. I don't like messing with partial footballs. Personal preference. The Kevlar is thick, so I roll epoxy right onto the mold. Then with helpers we lay the Kevlar over the top and smooth it out. I have two helpers at this stage, my mom and dad. I trust them more than my friends since this is our third time doing this, but of course I'd trust them more anyway. I mix epoxy and supervise while they roll it on. I have learned the hard way. Measure and mix epoxy very carefully. Members of this forum know this already. If you are reading this and this is your first time, MEASURE CAREFULLY. The Kevlar is harder to wet out than glass. Be patient. After the Kevlar is down I trim and roll the ends over the bow and stern. I don't keep my mold so I seal the ends up as I laminate. If you want to reuse the mold or if it is a stripper underneath leave the ends split otherwise you will never get the shell off the mold. The ends can be sealed later, but if it is done at this stage I think it looks much better. Follow up by putting on each layer of fabric and treating the ends accordingly. It took about 14 hours to finish the hand layup. A lot of that was waiting for the slow set epoxy to tack up before and while I did the fill coats. I used that time to feed my parents and friends who took over the second stage of helping me fill the weave.

You can see in the pictures some white lines running the length of the bottom board and up the stem. I laminated in polyester rope as skid plates. This will probably ruin my hydrodynamics, but my boats ground out all the time. It is the nature of my area, so I wanted some extra protection for the bottom. I don't know how well this will work yet. Jay Morrison has used it on his canoes, but I forgot to ask him about it when I talked to him. I'll ask him about it next time. Also, some folks add rope to their sailboat centerboards for the same reason.

Oh, while I was posting pictures I remembered I only had two kamikaze bugs for the whole laminate. I burned 6 citronella candles right outside the garage door. Worked like a charm.
 

Attachments

  • photo1873.jpg
    photo1873.jpg
    204 KB · Views: 2
  • photo1875.jpg
    photo1875.jpg
    249.7 KB · Views: 3
  • photo1874.jpg
    photo1874.jpg
    248.7 KB · Views: 2
Last edited:
No Title

Popping the shell off the mold:

This is the last step I'll post tonight. The rest can come later, so if you have questions ask away.

This part is great. Total mold destruction. If the ends are sealed the boat will not come off the mold without a fight. I embrace the fight and completely destroy the mold. It feels so good after all that drywall mud. I just unscrew the stations and bash away with a hammer. Once almost all the stations were knocked free I hucked the 150 lb mass on my back out to the yard and started ripping everything out.
 

Attachments

  • photo1878.jpg
    photo1878.jpg
    214.1 KB · Views: 5
  • photo1877.jpg
    photo1877.jpg
    232.3 KB · Views: 5
  • photo1876.jpg
    photo1876.jpg
    270.1 KB · Views: 5
Jim. Keeping the cloth tight around the tumblehome. Just staple the extra cloth to the bottom part of the stations. It will pull it tight and you can trim it off later. I think I already answered your question about what to do with the mold. It is very wasteful though. I don't like that.
 
I thought I would lay double sided tape, in the valley of the tumblehome, before shrinking the film. The double sided tape is so thin, I don't believe it will leave a noticeable mark, but will hold the film in while glassing. Worth a shot !

I don't seal the ends.
IMG_0404_zpsfpwg0eqt.jpg


Thanks again !

Jim
 
Last edited:
Right. If the tumblehome curves all the way over you can pull the fabric back into and under/over the gunwale depending on your perspective. If in what I understand is your case the tumble curves in and then recurves back up, double stick tape works for that. Exactly what I did for the hollows in the guideboat. It is so thin it doesn't matter. If you do get some wrinkles while sticking the film to the tape (hard to avoid) I put a layer of packing tape over that, after it is heat stretched, and it will smooth them out
 
Very interesting (and entertaining). Thanks for sharing this. I think you're breaking me of any desire I had to build a boat this way.

Alan
 
That's quite a build procedure, Muskrat. Very interesting post. I'm thinkin' I'd best keep to the little sticks and a stapler :)
 
Yup we're on the same page.

It would have been FUN dismantling the plug !

Your hull looks great ! Your'e getting me TOO EXCITED !

Jim
 
No Title

So far these posts have been a PSA against this build method. I don't want to scare anyone off completely. I'm very happy with the canoe I've built and I'm sure when the guideboat hits the water in the next month I'll love it too. Even if we don't have access to the methods that Charlie teases us with, we can still make a very light and tough composite boat. I think the problem with the method is the mold making. If you have a mold, making a kelvar and glass boat isn't that hard. After all this, I have come to the conclusion that starting with a stripper or any other canoe, and using it as a mold is the best option.

Carrying on, once the boat is off the mold all our troubles are long gone. I don't have as many pictures from this stage on, since work proceeds rather quickly. There is a lot of extra laminated fabric above the sheer line at this point, so we have two options. Cut the fabric down or attach the gunwales and trim the fabric later. I like to attach the gunwales first and then trim the laminated fabric using the gunwales as a guide. I use the stations that I have knocked out with the hammer and put them back in the empty shell, then I mark the sheer with a sharpie using the stations as a guide. I then attach the gunwales, full length ash from Northwest Canoe in my case. I am not as skilled a wood worker as most of you guys, and I don't have all the tools yet, so I bought full length gunwales. This is the same process for every other canoe build. A lot of screws and a lot of clamps. The composite skin is more flexible though, so I cut several scrap pieces and clamp them in to keep the beam dimensions proper.

Once the gunwales are on I trim the extra fabric down. Tim uses an angle grinder, but I haven't tried that yet. I find that the finer the teeth a saw has the better it will cut the Kevlar. A hacksaw cuts nicely, but the frame gets in the way, so I try every cutting device I have and always settle on a coping saw with the finest teeth I can find. It takes a lot of energy and time.

With a guideboat you can't hang seats from the rails because of the extreme flare in the hull. I used aluminum U channel as brackets that I PL premiumed to the hull and then Aluminum tubing for my seat crossbars. All the aluminum in the seat frames and thwarts is 6061T6 tubing, the same as Wenonah uses. I didn't want to mix a batch of epoxy for the six seat brackets and I have no idea yet how the PL will hold up, but I think it will do fine. I like a tractor seat while rowing because it keeps me from sliding around. So three seats go in the guideboat, two of them facing the wrong direction.

The carrying yoke needs to be removable as well as the middle seat as they tend to get in each others way. I already had a carrying yoke and felt the clamp on removable ones are overpriced, so I bought a couple gate hinges from the hardware store and two hitch pins. It set me back less than $10. I used an angle grinder to remove the stock pins from the hinges and attached half of the hinge to the yoke and the other half to the underside of the gunwales. That way I can drop the yoke in when I need to carry and it only takes two pins. Seems much sturdier than the clamp on yokes too. I will be tying the pins onto the yoke so I can't lose them.

That is as much progress as I have made so far. I still need to attach the oarlock sockets and laminate in a few ribs for torsional stiffness. Then I'll sand and varnish the hull and hit the water. I'm planning on taking it solo 340 miles along the Missouri river in late May from Kansas City to St. Louis for its maiden trip.
 

Attachments

  • photo1887.JPG
    photo1887.JPG
    352.6 KB · Views: 4
  • photo1888.jpg
    photo1888.jpg
    566.4 KB · Views: 5
  • photo1886.JPG
    photo1886.JPG
    316.4 KB · Views: 5
  • photo1889.jpg
    photo1889.jpg
    254.9 KB · Views: 5
  • photo1890.jpg
    photo1890.jpg
    233.7 KB · Views: 6
Funny how you used hinges to attach and remove your yoke ! I did the very same thing on my first canoe. in 91.

Did you glue your gunnels to the hull ?

The 340 sounds like fun on the Missouri ! Planning to camp ? How long do you expect it to take ?

Jim
 
I screwed the gunwales to the hull. I will glue them on the next boat. 70 stainless screws, the weight adds up.

I'll camp on the sandbars. I might go into the towns to re supply my cooler along the way, and I'll stop at coopers landing outside Columbia for a night. It's a strange place along the river and Katy trail where river people come and go. They usually have a band playing and some food for campers. I'll try to do 60 miles a day. I'm not in any hurry though. Whenever I get to St. Louis I'll take the Amtrak back. The boat will stay at my buddy's place until he comes back through KC.
 
Sounds like a good plan for the trip ! Enjoy, and good weather !

Jim
 
I've been asked not to post about guideboats anymore.

Consider this thread closed.
 
Back
Top