• Happy National Audubon Day! 🐣🐦🦅🕊️

DIY Canoe Skid Plate Install

Joined
Mar 19, 2013
Messages
69
Reaction score
15
Location
Canada
I recently helped out my friends over at Nova Craft Canoe by producing this little how-to video for them. It demonstrates how anyone can easily add protective skid plates to the bow and stern of your canoe. This would make a great off-season project if you have the appropriate work space. Apologies in advance for the bit of self-promotion at the end of the video, as it was originally intended to steer people towards my YouTube channel, but I thought the main content (the actual skid plate DIY) would be of interest to people on this forum. Please check it out:

https://www.youtube.com/watch?v=37UiLw1j9hk

Cheers
-Wayne
 
Great video!! The problem is Kevlar felt skid plates sucks... S-glass in multiple layer is a way better way to go at it if you want it to last and not damage the RX hull in an abusive environment. That said I don't instal skid plate anymore on new canoes, I wait for the canoe to need it! Less weight and better entry lines!!
 
Great video!! The problem is Kevlar felt skid plates sucks... S-glass in multiple layer is a way better way to go at it if you want it to last and not damage the RX hull in an abusive environment. That said I don't instal skid plate anymore on new canoes, I wait for the canoe to need it! Less weight and better entry lines!!

I think you are being a little harsh when you say "Kevlar felt skid plates suck". I realize there are other options available and of course, different canoes in different environments will determine what works best, however I have had three boats with Kevlar skid plates...two Nova Craft's and one Souris River. These boats have traversed thousands and thousands of kilometers of harsh white water, rocky bone-yard streams and rugged Canadian Shield tripping and never have I had any issues with strength or durability in regards to the Kevlar skid plates. Sure, they may add a bit of drag to the smooth lines of the hull, but they only add 2-3 lbs. total weight to the boat which I think is a small price to pay for the added protection they provide.
-Wayne
 
Thanks for posting the video. A much better looking and functioning application than the person did on my old Mad River Canoe. I like the tinted resin.

Mark
 
I think you are being a little harsh when you say "Kevlar felt skid plates suck". I realize there are other options available and of course, different canoes in different environments will determine what works best, however I have had three boats with Kevlar skid plates...two Nova Craft's and one Souris River. These boats have traversed thousands and thousands of kilometers of harsh white water, rocky bone-yard streams and rugged Canadian Shield tripping and never have I had any issues with strength or durability in regards to the Kevlar skid plates. Sure, they may add a bit of drag to the smooth lines of the hull, but they only add 2-3 lbs. total weight to the boat which I think is a small price to pay for the added protection they provide.
-Wayne

I won't start a debate on it, but if after all the harsh traveling you did and never had any issues, I have to say I'm sceptical.... That said, good for you, but I fix enough canoes in my life and paddle enough canoes in that same life, teaching ww to hundreds of people paddling thousands of km also in pretty bonny northern river to say that Kevlar skid plates sucks and don't always last like people assume they would! But obviously your milage varies!!
 
I don't want to enter into a debate either !

I have WAY less experience in White Water, than either of you !!! But I have a few skid plates under my belt.

The problem with Kevlar, is once installed, you can't smooth it out !

Well. Obviously the resin isn't Epoxy. What it is, isn't stated. Poly ? Vinyl Ester ???

Years ago I switched to Polyester Fleece, in place of Kevlar felt. It's not quite as abrasion resistant as Kevlar, but once the Polyester felt is saturated with resin, and cured it provides very good abrasion resistance, and it's Machinable ! It can be feathered out, so as not to create the extra drag, that Kevlar felt does !

Now days at the price of these new canoes, you'd think they would incorporate a skid plate beneath the gel coat !

Thanks for sharing the video Wayne ! I see nothing wrong in the sharing of ideas !!!

Jim
 
Back when I first started canoeing almost all boats had Kevlar skid plates. In fact I've had a few with them. I never thought much about it until I started repairing hulls a few years back. I didn't like how thick they were but never noticed any drag or any added weight. What I didn't like was how thick they were, just an visual thing for me. A few years back I switched to Dynel using a mix of resin and G-Flex which has made for a rock solid plate. Also, since most of the hulls I work on need a skid plate, they aren't new by a long shot, they get one put on during the process of the rebuild, it's given for me.

The video was very good, I really like that plastic that was used to cover the hull, I'll have to look for that, learned something new! I use newspaper but that looks a lot easier to apply! And the guy doing the job makes it look so easy, I always struggle with them. I guess it's to each their own as to what to use. Thank you for sharing the video Wayne!

dougd
 
Last edited:
So what would people recommend for a sleek boat like the Wenonah Voyager? Those knife-edged ends take a beating--mine is skin coat, with no gel coat. Northwest Canoe makes some narrow kevlar skid plates for fast boats, but the Dynel and s-glass sound appealing to maintain the sleek lines.
 
So what would people recommend for a sleek boat like the Wenonah Voyager? Those knife-edged ends take a beating--mine is skin coat, with no gel coat. Northwest Canoe makes some narrow kevlar skid plates for fast boats, but the Dynel and s-glass sound appealing to maintain the sleek lines.

This thread used to be fantastic but then the host for Mike's photos broke all the links so his step-by-step pictures are gone. Pblanc's still show up at least.

http://www.canoetripping.net/forums...ussions/diy/17299-​skid-plates-an-evolution

I've been using dynel for the past couple years and have been very impressed with it. Thin and light but very abrasion resistant. Better than s-glass by a good margin judging by how hard it is to sand through. It's held up very well.

Alan
 
Excellent! Exactly what I was hoping for. Dynel looks really appealing. I'm looking more for abrasion resistance than impact resistance, so looks like I'm headed in the right direction. Thanks.
 
100% Polyester Fleece, (sweat shirt fleece)
I used it in this case, not only for skid plate protection, but to hold the seam of the stems together.
Again it can be sanded, and provides enough bulk to act as a skid plate.

IMG_0941_zpsuomvdl9a.jpg
 
I've been using Dynel for abrasion resistance for over 25 years...there is simply no better abrasion resistant fiber!
Yes, it can be ugly, but not as ugly as a leaky hull.
As for a sleek, fine entry bow, well, each person has to decide for themselves if they favor aesthetics over performance.
I too, have used Kevlar, Kevlar/carbon, S Glass, E glass, and Vectra. None hold up as well as Dynel.

BTW, we had a similar discussion a while back:

http://www.canoetripping.net/forums/...tance-in-epoxy
 
Last edited:
I've been using Dynel for abrasion resistance for over 25 years...the is simply no better abrasion resistant fiber!
Yes, it can be ugly, but not as ugly as a leaky hull.
As for a sleek, fine entry bow, well, each person has to decide for themselves if they favor aesthetics over performance.
I too, have used Kevlar, Kevlar/carbon, S Glass, E glass, and Vectra. None hold up as well as Dynel.

BTW, we had a similar discussion a while back:

http://www.canoetripping.net/forums/...tance-in-epoxy

Another vote for Dynel. It is incredibly abrasion resistant.

I have worn down kevlar felt skid plates over time, even ones installed using the stinky urethane epoxy that once came with kevlar skid plate kits.

We reapplied skid plates to two boats that see hard use in limestone and oyster bar areas this fall. The S glass and E glass skid plates we installed last year as an experiment did not last a single season in those abusive conditions. The Dynel we installed was still sound and solid.

Dynel will swell fugly thick when saturated with epoxy, but it does not need to be so ugly. Using release treated peel ply over Dynel and compressing the fabric as the epoxy sets up will produce a nearly invisibly skid plate.

Dynel will wet out a milky white. Adding a dab of hull matching color agent pigment will resolve this. White pigment on white bottomed boats works and color blends very well. On red, green, etc hulls I have opted to add a dab of black pigment, and a spoonful of graphite powder for the blackest of black skid plates.

Like Doug I use a 50/50 ish mix of West System Epoxy and Gflex. Straight Gflex would be even better, but I have plenty of West resin and economize. I do not know if Gflex can be mixed with other epoxy resin brands. Anyone know?

I have sadly installed kevlar felt skid plates on dozens of canoe, and now regret every one. Likewise the S and E glass skid plates, shoulda just used Dynel.

Materials needed, copied and corrected from another post.

Enough yardage of Dynel cloth to cut the needed X inches of skid plate material. One yard should be enough to do two canoes bow and stern, or at least enough to have some leftovers if cut on the bias.

Enough release treated peel ply to cut up and cover the Dynel with two inch wider all around, laid atop and lapped over the sides of the epoxied Dynel. Again, one yard should be plenty with lots to spare

Gflex epoxy. Get the larger 16oz A and B bottles of G/flex. Again you will have plenty left, and Gflex is useful in many other adhesive application and other repairs.

If you have any West 105 resin and hardener you can mix the Gflex and 105 and hardener in any proportion to stretch the Gflex and economize. While straight Gflex would be better I have been using the 50 50 mix with epoxy resin.

If you want graphite powder and black pigmented skid plates order a 1oz tube of black color agent. It only takes a tiny dab to tint a pot of epoxy, so one tube of pigment is enough to do 20 skid plates. Add the pigment first, then, little at a time, add a spoonful of graphite powder.

Or just a tube of color agent to match the hull color if you prefer. The pigmented epoxy has to go on in the initial and wet out coats so it soaks into the fabric.

Graphite Powder. One small can of graphite powder is enough to do 20 skid plates.

Disposables needed - Chip brushes and/or small foam roller, sleeves and pan. Painters tape. Disposable gloves. Sandpaper. Isopropyl alcohol. Popsicle stir sticks and plastic mixing cups. Newspaper. Acetone in case you spill or drip is handy to have available. For better UV longevity a can of Rustoleum gloss spray paint to eventually topcoat the epoxy after cure and outgassing.

Dynel
https://www.jamestowndistributors.c...do?pid=4214&familyName=Dynel+Fabric+%2F+Cloth

Release Treated Peel Ply
https://www.jamestowndistributors.com/userportal/show_product.do?pid=3754

Gflex
https://www.jamestowndistributors.com/userportal/show_product.do?pid=8694

Pigment
https://www.jamestowndistributors.c...?pid=7886&familyName=Evercoat+Coloring+Agents

Graphite Powder
https://www.jamestowndistributors.com/userportal/show_product.do?pid=3763
 
  • Like
Reactions: reb
Graphite powder: I buy it at the farm store. It's sold for lubricating farm equipment. It comes in squeeze bottles with ketchup style tip. Invert the bottle and give a little squeeze into the epoxy cup.

Despite using peel ply I still always seem to end up with some roughness and voids in the dynel that needs to be filled. I mix thickened (really thick) and tinted epoxy and apply it with a squeegee. This does a nice job of filling in even large voids with only one or two applications without glopping it on too heavy where it's not needed. Since it's such a small area you can use fast setting hardener do multiple fills/day if needed.

Alan
 
Dynel skid plate installation.

Also copied and corrected from another post. And added to, I am still learning about Dynel and peel ply work. Most recently, cut the peel ply two inches larger than the Dynel, and using a red hot knife blade to cut Dynel is really not a good idea.

If you opt to go Dynel, Gflex and peel ply I will offer my installation method. I do not remove the ABS layer as is sometimes suggested, and at most do a light sanding 220 sanding to remove any gloss that remains on gel coated hulls. The Gflex prep chart shows a simple alcohol wipe and flame treat as having the highest tensile adhesion for ABS hulls.
https://www.westsystem.com/specialty-epoxies/gflex-epoxy-adhesion-data/

Clean the stems with alcohol. I wash the whole boat first, mostly because I do not like working on a dirty hull and possibly transferring contaminates onto the hull area in question, and also because detail washing is a good way to get up close and personal with a boat, and often find other areas in need of attention.

Alcohol wipe the stems and beyond where the skid plate will be installed.

Design the length, width and shape of the Dynel skid plates.

Cut that Dynel shape. It helps to make a paper template and transfer that pattern to the Dynel. Dynel cuts with a fairly clean edge using scissors or a razor blade. Do not reproduce the experiment we tried this fall and use a red hot knife edge, that just made an unholy mess, and turned the edge of the Dynel purple.

You can opt to cut Dynel on the bias and it will better conform to complex curves, but that wastes a lot of Dynel fabric. I am cheap, and release treated peel ply flattens the unbiased edge wrinkles, so I cut the Dynel in the most fabric economical way.

While you have that cut Dynel out lay it atop the peel ply and trace and cut the peel ply about 2 inches larger all around. All of the fabric materials are now ready.

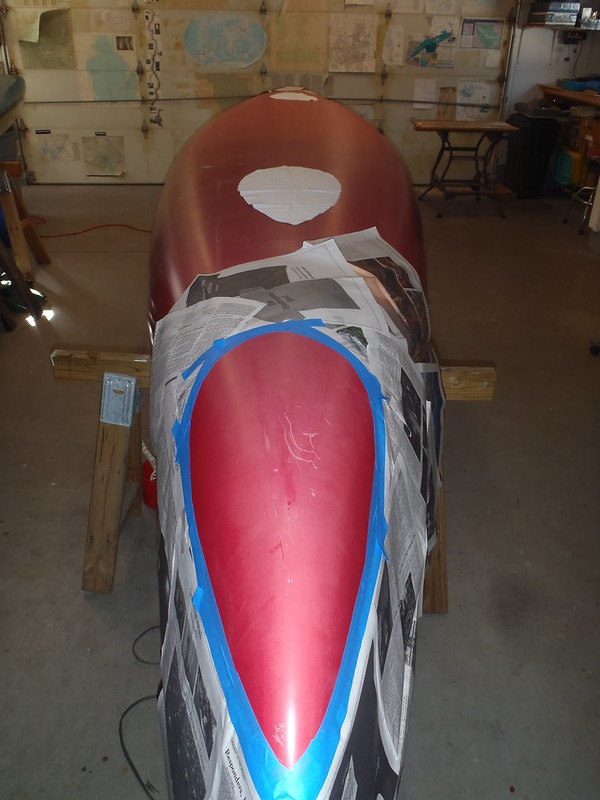
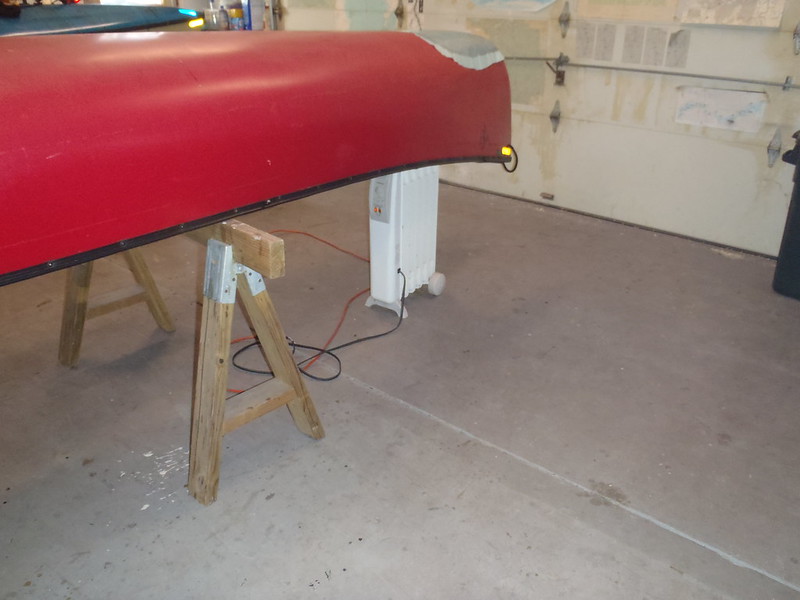
Lay that Dynel shape on the stem and tape out a perimeter on the stem about a quarter inch away, all the way around. I use blue painters tape for a clean edge.

I admittedly spend an inordinate amount of time taping and papering a hull. I can be drippy sloppy and sometimes over generous with the resin. Using peel ply helps evenly spread and level my over generous resin applications.

Once that perimeter tape is in place I use little pieces of Scotch tape to adhere sheets of newspaper half way up the blue perimeter tape, and then lap that edge with another perimeter of tape so the resin can not drip down under the newspaper.

You will need to cut the newspaper at the stem tip into a curve. I just hold the paper up, roughly pencil mark a curve line on the newspaper edge and round that corner off. It does not need to be precise since the second perimeter of tape will cover any slight scissor curved misshape.

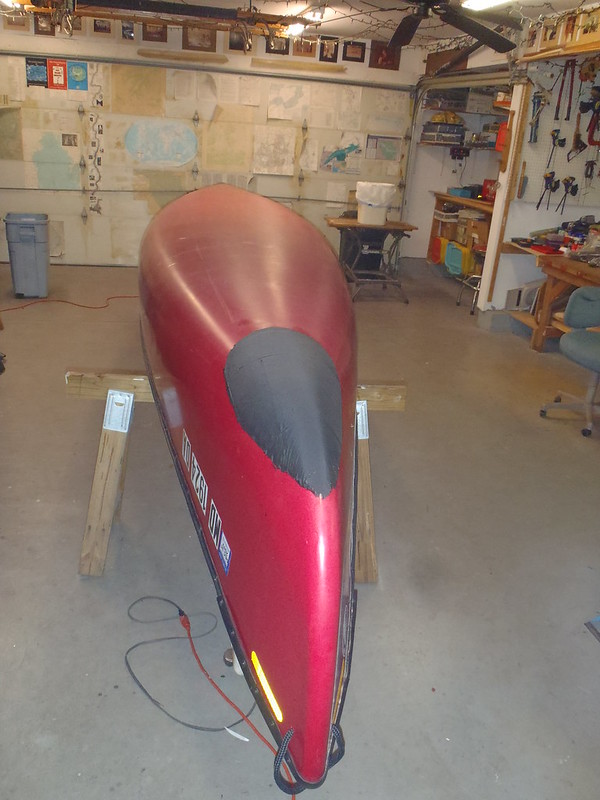
Mix your pot of resin. I economize with a 50 50 mix of West epoxy and Gflex, but straight Gflex would be better and require fewer materials purchased. Warm the Gflex bottles first, it is more viscous than regular epoxy resin. I do not mind the look of opaque black skid plates, so I add graphite powder and a dab of black resin.

Flame treat that skid plate area with a brief pass of a propane torch. Yes, you can do this with the tape and newspaper in place. The tape will withstand a brief pass of blue flame tongue and it is best to do that flame treatment immediately before resin application.

Press the tape down one more time with your thumb all the way around, just to be sure it is all still well adhered on the hull, with no gaps or lifts for the epoxy to drip down through.

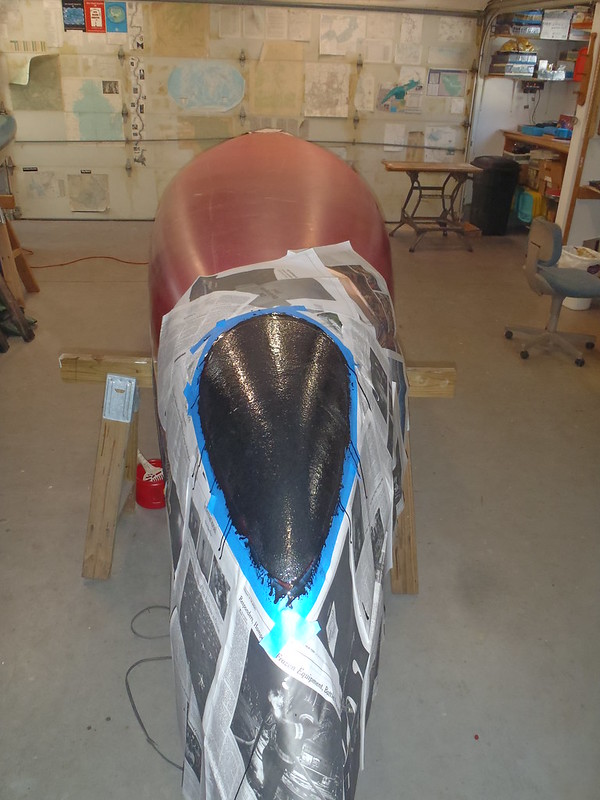
Paint on a coat of epoxy resin inside the taped skid plate area.

Lay the Dynel atop that as carefully and smoothly as possible and top coat it with more resin. Dab at the edges until you realize you are doing more harm than good.

Walk away.

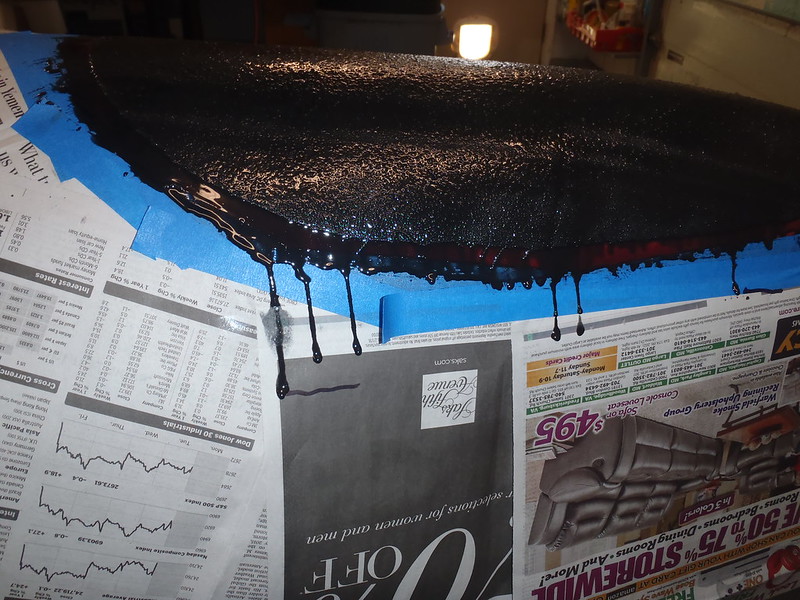
Watch the excess epoxy drip down the newspapered edges. When those drips seem to have stopped remove the outer tape layer and newspaper. I mark the bottom of a few drips with a Sharpie on the newspaper, when the drips stop running past the Sharpie hash marks it is OK to remove the newspaper and second applied layer of tape. If you thought ahead and left little foldover tabs on the tape this will be easy.

Walk away, but not far. Are the epoxy drips still creeping down the remaining perimeter tape? Egads, do not let them drip onto the unpapered hull. You can fold up the bottom edge of the tape to contain them, or hit the drips with the brush. Have a can of acetone and a rag available is a good thing when doing any epoxy work.

When you judge those drips on the primary tape layer to have stopped creeping, pull that remaining layer of tape. Again, having folded little tab ends on the tape helps.

I take the tape off before the peel ply goes on, because I do not want to risk epoxying the painters tape to the hull. There may be a trick to leaving the tape in place that I do not yet know.

The resin and cloth are still tacky and compressible, and have not yet swollen like cured epoxy Dynel. BTW, epoxied Dynel without peel ply is rough textured and swells, someone once said, as thick as an old sweatshirt. Do not want either. Peel ply will resolve both issues, and will also level out uneven epoxy application.

Lay the release treated peel ply over the Dynel and epoxy. Carefully and smoothly, leaving some overlap all the way around, hence the 2 inches larger piece of peel ply, just in case your placement atop the still tacky epoxy is a little off kilter.

Press the peel ply into the Dynel. I finally broke my small hard plastic roller, but a disposable gloved hand works just as well.

Walk away, but not too far. In half an hour or so come back to the hull and press the peel ply down again, especially any raised areas, bubble or voids that are visible under the peel ply.

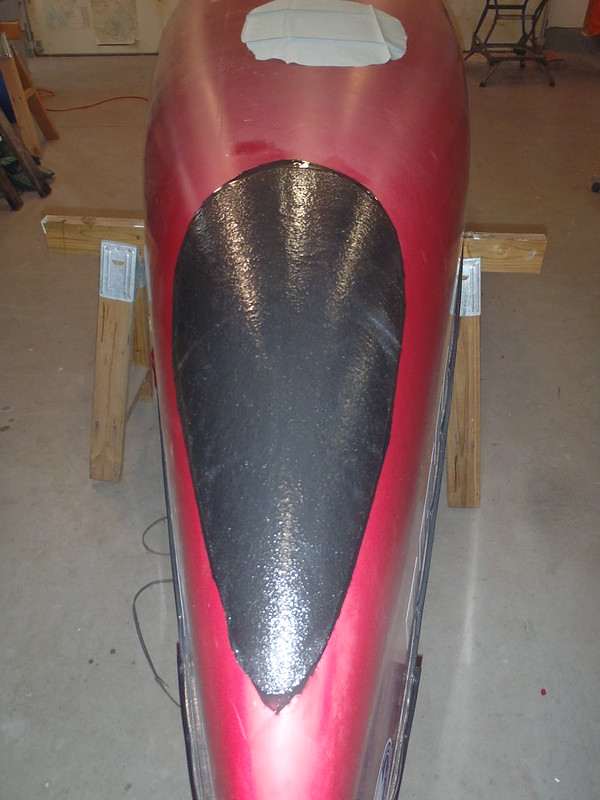
Repeat every 30 minutes for a couple hours, especially the edges. With the Dynel compressed as the epoxy sets up even the transition edge will largely disappear.

Walk away for the night. God bless release treated peel ply. The first time you remove peel ply from day old resin will be a fingers crossed and saying prayers moment. It need not be; the release treated peel ply will pull off like a Postit note.

The resin edge will be a little smushy indistinct from compressing the peel ply. No worries, most epoxy resins do not fare well in sun exposure over time without some UV inhibitor top coat, especially if you store your boats outside.

I use cheap Rustoleum enamel paint or etc as a UV topcoat. There are more expensive and more durable epoxy paint products.

If you want the underlying fabric to match the hull you can add a drop of pigment to the epoxy resin mix. The pigmented resin will deeply saturate the cloth, and when you scrape and scratch the paint topcoat the underlying color match will not show through as badly.

Wait at least a few days for the epoxy to outgas. A week is better. Wash to remove any amine blush. Tape and paper the canoe as before. Paint the skid plates in your color choice. Pull the painters tape as soon as you are done painting for a nice clean edge line. In a couple years, when you have binged some rocks and dragged the stems, tape it up and spray it again if aesthetically need be.

Yeah, that sounds laborious, but even with the prep time spent protectively taping and papering the hull it is only a couple or three hours spread over two days, and the Dynel and peel ply result is well worth the effort.
 
WOW ! Sounds like Dynel is the winner !

Used it on Vader's stems. Haven't really put it through the test.

I have some Fiberglass Wonder Scoops for moving snow. One that is brand new. They erode terrible on cement. Before I put the new scoop to the test, I will apply a layer of Dynel, to the bottom edge, and see how it will hold up.

In applying Dynel to Vader, the one thing I didn't like, was the fairly open weave it had. I filled it with epoxy and graphite powder.. Again, I haven't put it to the test.

Jim
 
Last edited:
Dynel has worked great for my strip boat so far, with 2 pretty hard use seasons behind it. I can't seem to wear through it, even though I tend to run my boat up on rock shelves. It seems to chip off in good sized chunks if you ram into granite rock, or drop the bow onto rocks like I do. I used regular epoxy, but I imagine that gflex would have probably absorbed those hard knocks a bit better.

Mark
 
I just installed Dynel and graphite powder skid plates on the live aboard motor canoe. I looked at the clock when I first began.

Alcohol wiping the stems, making a paper skid plate template, cutting the Dynel and peel ply to size and shape, taping and papering the hull, mixing the Gflex and West 105 206, painting the epoxy mix on, laying the Dynel cloth atop the epoxy, filler coat of epoxy on that. . . . .took just over 1 hour after all the tools and materials were prepositioned. With no beer breaks.

Epoxy mix, 50 50 Gflex and West 105 206, painted on hull.

EDIT. Correction. Naked and largely unscraped stem. Once I spread the epoxy, seconds after flame treating the stem, I was not picking up the camera with gloved hand before the Dynel and top fill coat went on. No photo of just the epoxy base layer. Use your imagination.


24674094577_e3961f4f90_c.jpg
P1050345 by Mike McCrea, on Flickr

Dynel laid in place and filled with epoxy mix

38832873514_822895b47d_c.jpg
P1050347 by Mike McCrea, on Flickr

Marking the ends of the drips. Once the drips stopping running I can remove the newspaper mask. Note the rough texture of the Dynel before peel ply application.

38832869794_4ed6b4d692_c.jpg
P1050351 by Mike McCrea, on Flickr

Peel ply ready to go after tape removal

25671188278_6ef2fb0503_c.jpg
P1050354 by Mike McCrea, on Flickr

I left extra two inch perimeter on the peel ply. Still not quite enough. It is a long, wide piece of Dynel, and an even bigger piece of peel ply. Placing either would have been a better two person job, each holding one end. Even with 2 inches of slop I was awfully close to the edge in places. Maybe 3 inches of peel ply edge slop is better if working solo with big pieces.

Then the waiting game. I am not fully heating the shop. Instead I have a radiant oil heater set on low under each stem of the canoe. The shop is at 63F. The inside of the heat captured boat, and the hull itself, is at least 10 degrees warmer.

38832866694_3ed417b911_c.jpg
P1050355 by Mike McCrea, on Flickr

I spent a half hour pressing the peel ply into the Dynel, until any whiteish voids on the peel ply disappeared, and paid special attention to the edges of the Dynel, to reduce that cloth to hull transition to near invisibility.

Out of curiosity, near the end of the day, I put a thermometer atop the hull near the skid plate. 73f on the outside of the hull above the radiant oil heater. I wonder what the temperature is up inside that giant beanpod heat trap. A thermometer on the stern seat bottom read 81F.

I can crank those radiant oil heaters back another notch. Gawd bless that inverted canoe shape for capturing heat. I have used heat lamps and hot halogen bulb lamps to warm hulls, but I can stick a radiant oil heater under the canoe, with the temperature set down near as low as it goes, and still maintain a warm hull in a cool shop. And if necessary feel safe about leaving it there overnight at 600 W on low. The shop may be cold, but the hull is warm.

Now the real waiting game. I will not pull the peel ply until tomorrow morning. Or will I, should I, can I wait to try pulling the release treated peel ply? I know what it should feel like when it lift releases cleanly.

Maybe just a little tug at one corner. Well heck, 4 hours after epoxy application, with the hull kept at 73F, and that epoxy is set. The peel ply pulled off clean and easy.

Peel ply off. Almost as smooth as a babies butt.

24674057177_0a9d43f9e7_c.jpg
P1050362 by Mike McCrea, on Flickr

A little light sanding where the peel ply folds induced creases, and a UV protective top coat of black enamel paint to help better define sharp edge lines, and those puppies will look sharp.
 
Last edited:
Great video!! The problem is Kevlar felt skid plates sucks... S-glass in multiple layer is a way better way to go at it if you want it to last and not damage the RX hull in an abusive environment. That said I don't instal skid plate anymore on new canoes, I wait for the canoe to need it! Less weight and better entry lines!!

I agree completely with Canotrouge. The OP's video is a very good one if you want to put on Kevlar felt skid plates, as are many of his other videos I skimmed. However, I think skid plates are complete waste of time, money and hull performance.

I put Kevlar skid plates on my first canoe, a Mad River Royalex Explorer. Never again. None of my 15 or 16 canoes have gotten damaged on the stems, not even my aggressively paddled whitewater canoes. Those have worn under the central seat, gotten wrapped, had gunwales broken, but no significant wear on the stems.

I shudder in horror at adding skid plates to an expensive and light composite canoe. The skid plates will alter the smooth, laminar flow of water around the bow, and they will add weight in the worst possible place for maneuverability -- inertial swing weight at the ends of the hull.

Skid plates are ugly. I don't like my canoes deliberately made ugly.

In general, preventive lamination makes no sense to me. The bottom of every canoe will definitely get scratched. Does it make sense to put a layer of Kevlar felt (or Dynel) all over the bottom of a canoe before you even start using the canoe? Not in my opinion. Add "fix-up layers" of material after your canoe is damaged not before, and only where it is damaged.

Finally, treat your canoe with respect and care so it doesn't become damaged on the stems or anywhere else, if you can avoid it. Don't ram your canoe onto the shore. Get in and out of the canoe while it is in the water. In other words, "wet foot" your entry and exit; canoeing is a water sport. Don't drag your canoe unless absolutely necessary. And learn moving water paddle skills and still water freestyle skills, so that you don't hit hard objects in the first place.
 
Back
Top