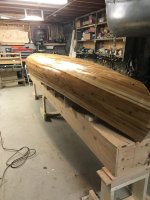
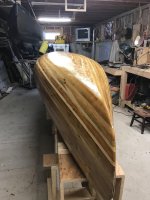
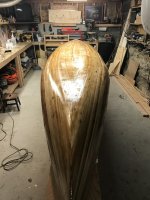
Well, I decided to go with a seal coat of Epoxy. Read through Gils book again and made a command decision to seal per the books recommendation. This seems to be a 50/50 affair with individuals. I have also decided that when I lay the fiberglass that the football will go under the main layer then wet out. I will play with intricacies down the road with different methods but for this first build and seeing that this also seems to be a 50/50 preferred method I figured I would follow the book again. Here are some pictures after the seal coat.
-
Happy "Killer Rabbit" Attacks President Carter in His Paddle Boat (1979)! 🚣🏼♂️🐇
You are using an out of date browser. It may not display this or other websites correctly.
You should upgrade or use an alternative browser.
You should upgrade or use an alternative browser.
My First Canoe Build
- Thread starter dcloots
- Start date
Looking good! That's how I did mine. Follow the book.
Just uploaded my latest video on my canoe progress. Check it out if you’d like.
PART 7, FIberglassing The Exterior Canoe Hull
https://youtu.be/N46dSUN1REs
PART 7, FIberglassing The Exterior Canoe Hull
https://youtu.be/N46dSUN1REs
Way to go! You handled it like a pro!
Alsg, far from a pro but maybe a tad more skilled than someone who has never built a canoe!
Question for the forum. I missed the window to continue with a chemical bond with the follow on epoxy fill coats so I have sanded the hull once again after the initial wet out. My question is do I need to continue with the mechanical bonding technique or if my timing is better can I chemically bond the last two epoxy fill coats? Any advice will be greatly appreciated. Thanks in advance.
Question for the forum. I missed the window to continue with a chemical bond with the follow on epoxy fill coats so I have sanded the hull once again after the initial wet out. My question is do I need to continue with the mechanical bonding technique or if my timing is better can I chemically bond the last two epoxy fill coats? Any advice will be greatly appreciated. Thanks in advance.
How long did you miss it by? I talked to a tech at system three and he said you had 72 hours between coats before sanding would be needed. I suspect most epoxies are pretty much the same, despite what some people may say. I have always waited between coats until they have hardened up, often overnight, sometimes up to 48 hours, and nothing fell apart, lol.
Maybe I was failing on the side of conservative but 36 hours had elapsed since I was able to return to the project. Gils book clearly states 24 hours as well. Hard as a rock so I assumed that the cure was complete. I proceeded to sanding, assuming this was my only option. From here on out can I just chemically bond the next two layers? I would prefer that....obviously! The follow on methods after sanding is not clear with applying the final fill coats and how to do that.
Last edited:
Maybe I was failing on the side of conservative but 36 hours had elapsed since I was able to return to the project. Gils book clearly states 24 hours as well. Hard as a rock so I assumed that the cure was complete. I proceeded to sanding, assuming this was my only option. From here on out can I just chemically bond the next two layers? I would prefer that....obviously! The follow on methods after sanding is not clear with applying the final fill coats and how to do that.
Doesn't matter if it's the wetout coat or fill coats. The chemical bonding time doesn't change. If you miss the window (whatever it might be) then you should sand lightly first.
Alan
System Three will tell to apply fill coats while the previous coat is still tacky ! It does help a great deal as far as runs, on the sides ! I also believe a clearer finish.
People have the impression that 72 hrs, and It's good ! It's much better closer to two hours ! Conditions such as heat and humidity come into play when you start stretching the time.
I had one instance looking back, of a fill coat not bonding very well ! I believe it was do to an Amine Blush, more than anything else. Since then I don't like to take the chance of waiting.
I personally wouldn't wait past 24 hrs. And I have no problems.
I'm not familiar with US composites, as all my experience has been with System Three, and RAKA. Oh, and one time with cld West System.
Moral of story ? Waiting causes more unnecessary work !
Jim
Doesn't matter if it's the wetout coat or fill coats. The chemical bonding time doesn't change. If you miss the window (whatever it might be) then you should sand lightly first.
Alan
Thank you for your response. I will move forward with the chemical bonding method for the last two fill coats.
Wanted to take a moment to thank the many on this board during my first canoe building process. I admire all of your experience, recommendations and techniques. Sometimes my decisions were made based more on time with a rational conglomeration of all of your input and I have been blessed with the knowledge in this forum. Unfortunately while living in a urban area many don’t understand the passion and the desire to do something like this on your own as you all do, and I have received jokes and whatever etc..., but I have come to the realization that these comments come from people that do not challenge themselves and move forward with the status quo. I am very disheartened by those that don’t understand why I am doing this and how I exactly intend to use my craft that I built with my own hands. I have decided it is not worth the explanation as to why but more of a thanks to those that helped me along the way such as Jim Dodd, Robin Lauer, Alsg, Rick R, Odyssey & Roybrew. The technical. Information that I was always searching for was kindly provided by Jim Dodd, Alsg, Cruiser, Alan Gage, Memaquay (Rob Haslam), Stripper Guy & Dogbrain. I am honored to be in such a great presence of people that understand why I do what do or at least try to do what you have all done! You are all inspirational and I thank you for your criticisms, recommendations and corrections. I would not have a product that resembles something that would float without your advice. I hope to share advice in the future as well with someone who has the same desires to learn. This is a heart felt thank you to all of you and I appreciated every word you shared with me along the way. Here’s to finishing this canoe so I can realize it’s splendor on its first solo trip in the Allagash region.
Last edited:
It is one those lifetime highlight moments, when you get in that canoe YOU built ... it wobbles, it bounces a bit, you push off and you are actually floating in something you built ... you will marvel at it, on every trip. This building is a very rewarding experience, likely why so many builders come back again and again.
Additionally, if you do wood working, i have found that the experience seems to fundamentally change how you view other projects, I think the expertise/techniques you use building a boat deepen your "toolbox of tricks", so that hand tools, gluing and using epoxy all seem less mysterious and within routine reach for every project. This in turn pushes you to go farther and try other new ideas .. few people push that far, so good on you.
Brian
I have you to thank Dcloots. I'm just dragging along watching you, so I can learn how to do it. You are obviously very knowledgeable, and as Yogi would say, "Smarter than the average bear".
Your not done yet. You still have the inside to finish, right? I look forward to seeing this through till your first paddle in that craft.
Again, Thank you.
Your not done yet. You still have the inside to finish, right? I look forward to seeing this through till your first paddle in that craft.
Again, Thank you.
I have you to thank Dcloots. I'm just dragging along watching you, so I can learn how to do it. You are obviously very knowledgeable, and as Yogi would say, "Smarter than the average bear".
Your not done yet. You still have the inside to finish, right? I look forward to seeing this through till your first paddle in that craft.
Again, Thank you.
Roybrew thank you for your kind words, However at this stage in my canoe buidling years my knowledge is limited due to inexperience. I have learned along the way (made plenty of mistakes) and asked questions to correct them or I figured them out on my own. The most important aspect is to read...read...read..and read again. I found that even after reading there were important steps that kind of get blurred with all of the details. I know this now and before I proceed with a step...I read...read some more and then read just a touch more I look forward to following along with your canoe build.
And yes I have only completed the exterior hull. Time to get to work on finishing the inside. Probably get some good work in on Friday after I pick up my ash lumber.
Well so much for the excitement of sourcing 20’ long ash boards! Picked them up about one month ago and now they all have severe bows to them. Thinking I have to half them and process for decent edges so that I can scarf joint the gunwales. Very disappointing.
That sucks. But it may be salvagable without cutting them in half jointing and scarfing --assuming the board is only bowed and not twisted or warped.
If I recall correctly, Wabnaki gunnels are 3/4 x 3/4. If the board is thicker than 3/4 but only bowed, you can run it through a thicknesser to get to 3/4. Won't remove the bow but will get you consistent thickness.
Then, assuming the original edge was and remains reasonably straight in one plane notwithstanding the bow, you could put a short edge guide on a circular saw and rip off 3/4 slices.
Then orient the bow to your advantage (canoe bows out at the middle). The gunnels are thin 3/4 x 3/4 IIRC and bend pretty easily at those lengths (gunnels on the 16' wabnaki are probably closer to 18 ft long taking into account they have to bend out in the middle of the canoe and up at both ends -- although I never measured mine).
Don't shoot me for suggesting this BUT at 3/4" x 3/4" that gives a very much overbuilt, heavy gunnel. I am of the opinion that you can safely reduce that quite a bit and still be fine.
If you use the skillsaw method of cutting the gunnel blanks, the bows and even twists don't matter very much, you can just cut along the board, producing consistent blanks. The blank is far more flexible than the board, if you reduce the thickness to 5/8" or even 1/2" it will be more flexible still.
Don't forget those blanks need to flex on the canoe anyway, so the only issue is getting then cut in the first place. I would consider reducing that thickness and use the skillsaw method for cutting the gunnel blanks, I think you may find you really don't have a problem.
Brian
Yes the Wabnaki gunwales per plan are 3/4” x 3/4”. Today I started rigging a ripping form since I do not have a skill saw guide. Maybe I should go pick one up tomorrow. Most of my cutting is accomplished on the table saw, however with 20’ boards one would need a very large basement so I need to resort to the skillsaw.
It amazes me that 3/4” x 3/4” can present an overbuilt condition. When one thinks about it that dimension is not really much surface area at all. Being my first build I am obviously underestimating the strength and function of a lesser dimension. I would greatly like to reduce weight and if 5/8” will satisfy the hull integrity then I should probably do that. What would you recommend for hardware sizing for the seats, carrying yoke etc.....with a 5/8” x 5/8” gunwale?
It amazes me that 3/4” x 3/4” can present an overbuilt condition. When one thinks about it that dimension is not really much surface area at all. Being my first build I am obviously underestimating the strength and function of a lesser dimension. I would greatly like to reduce weight and if 5/8” will satisfy the hull integrity then I should probably do that. What would you recommend for hardware sizing for the seats, carrying yoke etc.....with a 5/8” x 5/8” gunwale?
You don't need a commercial jig. A straight section of 3/4 ply a few inches wide by 18 inches long clamped or screwed/bolted to the base plate will do. A number of members here have demonstrated this technique for ripping strips. Search the forum. The only difference will be the spacing; you will need a 3/4" (or whatever you settle on) gap between the improvised fence and the blade.
Here's Jim Dodd's thread using angle aluminum but wood will work just as well. http://www.canoetripping.net/forums/forum/paddlecraft-construction/25073-cutting-strips
Here's Jim Dodd's thread using angle aluminum but wood will work just as well. http://www.canoetripping.net/forums/forum/paddlecraft-construction/25073-cutting-strips
Last edited:
Similar threads
- Replies
- 12
- Views
- 943
- Replies
- 73
- Views
- 6K